Getting started with the Weld4Me online tutorial!
This e-learning introduces the HC10 Weld4Me with a YRC1000 controller, Teach Pendant and Welding Wizard!
Weld4Me CE Cell
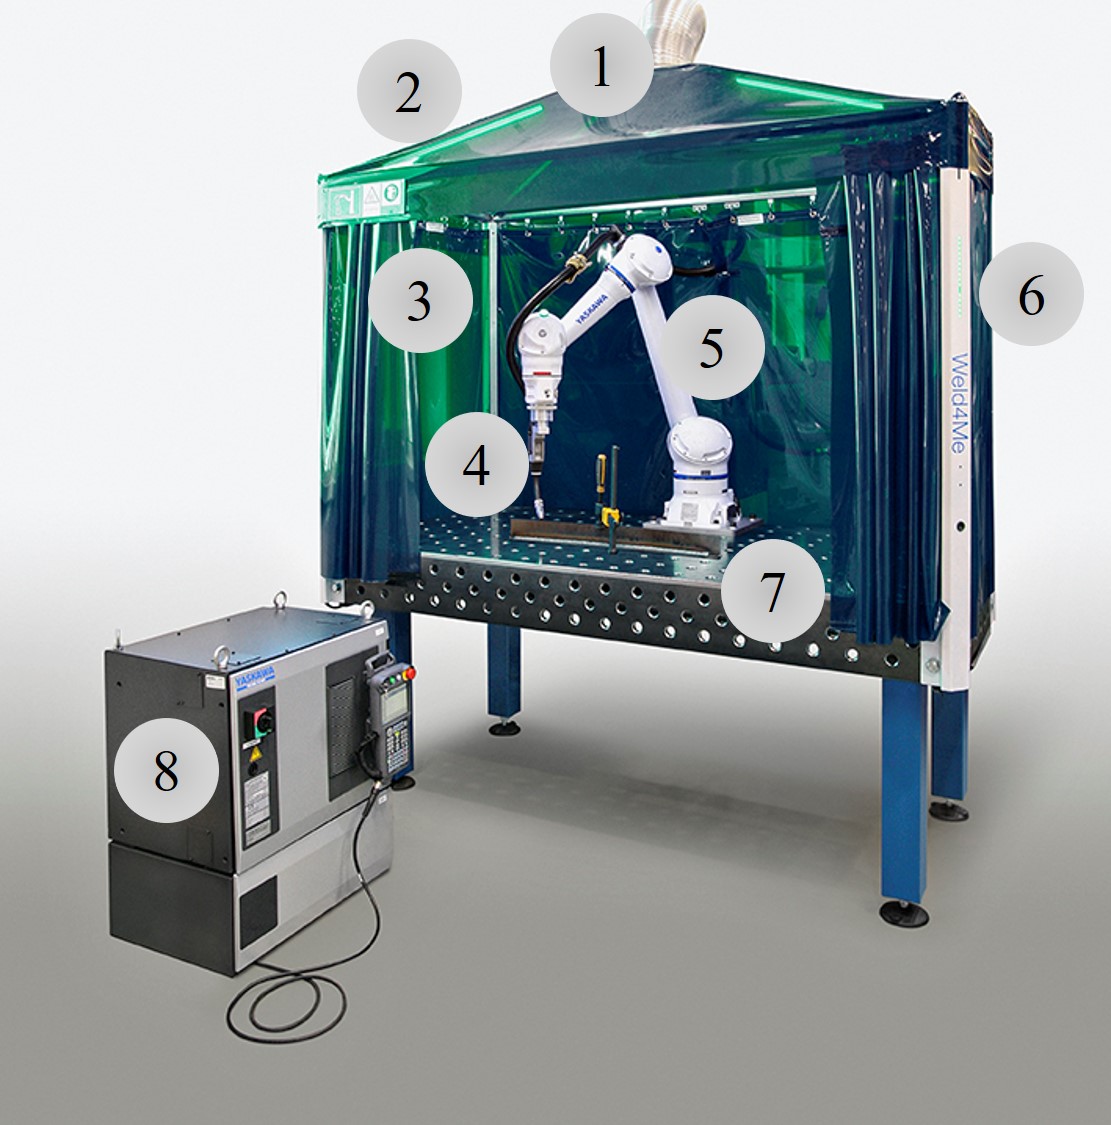
If you are looking for an alternative or supplement to manual welding, the Weld4Me CE turnkey collaborative robot station has all the advantages you need. It brings the consistent quality of robotic welding to your production process, while being easy to install and operate. With its rigid and industrial standard quality design, the Weld4Me CE is perfect for small welding shops and small batches and high variety. Robot, welding table and enclosure of industrial design quality and with full welding functionality. It will bring you better quality and productivity compared to manual welding.
1) Fume extraction
2) Interior lighting
3) Open sides for long workpieces
4) Welding torch with cable package

5) HC10 DT IP67 welding cobot
6) Integrated LED stripe indicating operation status
7) Welding table with 100 x 100 mm grid
8) YRC1000 controller + welding power source
Weld4Me Mobile Station
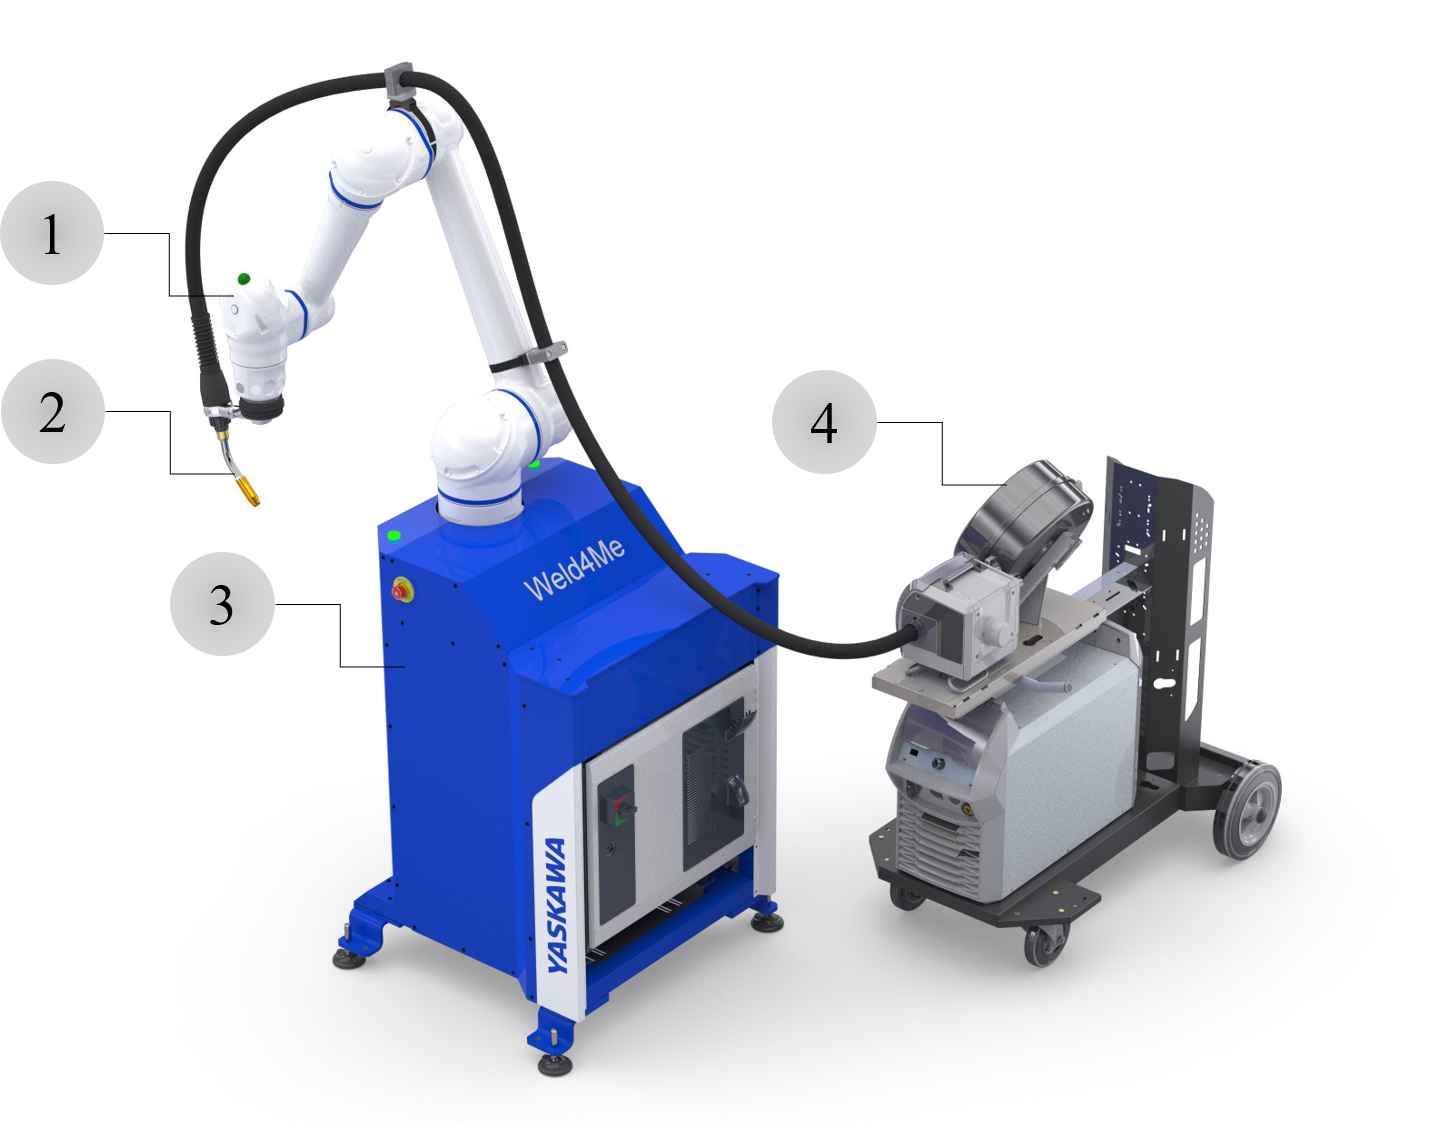
As an alternative or supplement to manual MIG/MAG welding with air-cooled welding equipment, the Weld4Me robot station offers all the advantages needed. It has a small footprint and is easy to move with a hand pallet truck, and it brings the consistent quality of robotic welding to your production processes.
1) HC10 DT IP67 welding cobot
2) Welding torch with cable package
3) Operational platform with YRC1000 controller
4) Welding power source

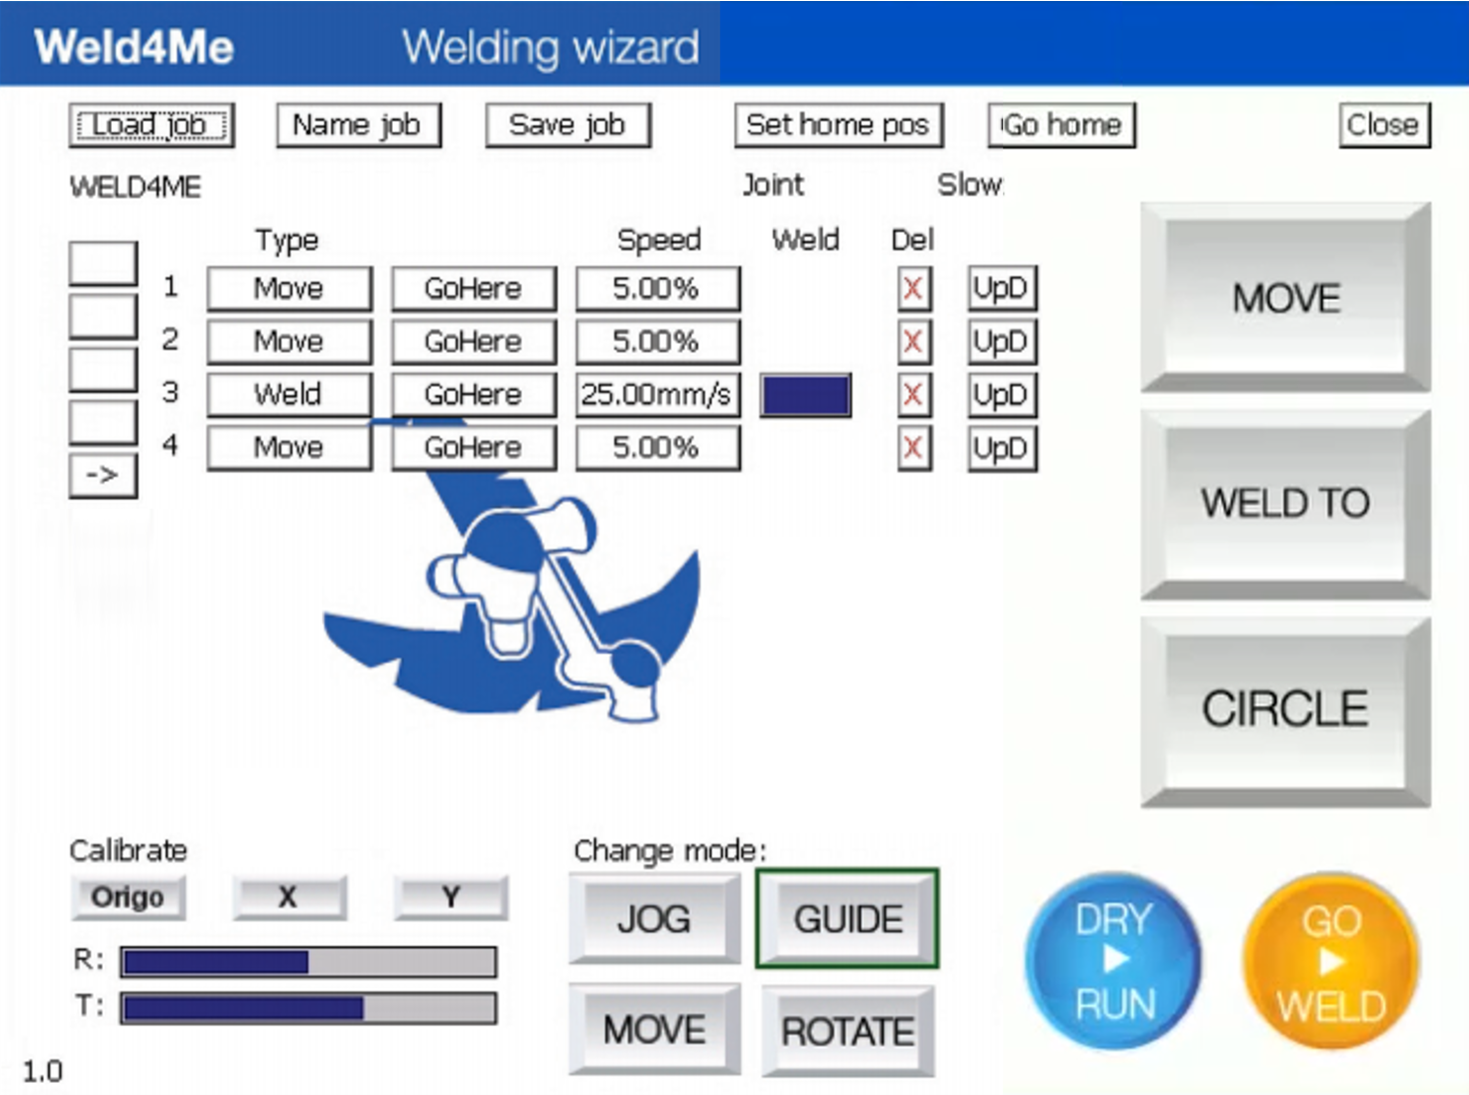
General commands:
-Load job: Load an existing job
-Name job: Name or rename the current job
-Save job: Save the current job
-Set home position: Configurate a safe home position for the cobot
-Go home: Move the cobot to his previously defined home position
-Close: Close the welding wizard interface and return to the classical interface
Programming commands:
-Move: Moving command without welding activation, direct motion (joint movement, MOVJ)
-Weld: Moving command with welding activation, linear motion (MOVL)
-GoHere: Move the cobot to the selected position
-Speed: Selected speed of move [%] or weld [mm/s] commands
-Weld blue field: assigning of respective job number in welding power source
-Del X: delete current position
-UpD: update current position with new one

Teaching commands:
-MOVE: teach a move motion without welding activation (MOVJ)
-WELD TO: teach a linear motion welding activation (MOVL)
-CIRCLE: teach a circular point; the controller needs 5 taught points to calculate the circle
Guiding commands:
-JOG: moving the cobot with the buttons on the pendant
-GUIDE: hand guiding the cobot in all directions
-MOVE: hand guiding the cobot in a linear way (x, y, z direction)
-ROTATE: rotate the cobot around its tool center point (TCP)
Operation commands:
-DRY RUN: test the program without activating the welding functionality
-GO WELD: execute the program with activation of the welding functionality
Welcome to your first robotic welding seam!
In this tutorial you will learn how to program a corner welding seam!
In this tutorial you will learn how to program a fillet welding seam!
In this tutorial you will learn how to program a circular welding seam!
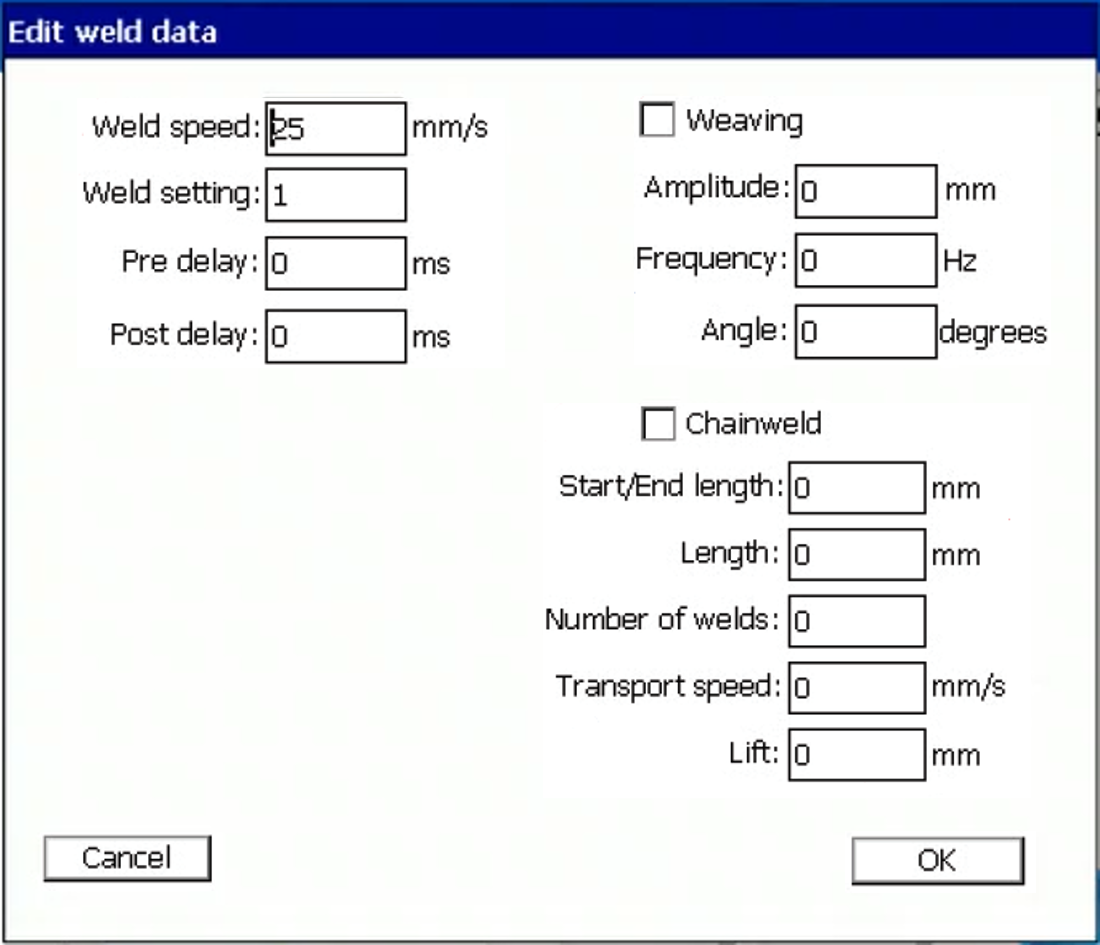
Overview of advanced welding functions:
-Weld speed: defines the speed that the cobots welds with
-Weld setting: defines the assigned job number of the welding power source
-pre-delay: defines the time interval, that the cobot waits before starting welding
-post-delay: defines the time interval, that the cobot waits after finishing the welding job

Weaving Functionality
In this tutorial you will learn how to add the weaving functionality to a welding job!
Chainweld Functionality
-Start/ end length: defines the length of the single welding seams
-Length: defines the total length of the workpiece
-Number of welds: defines the number of welding seams
-Transport speed: defines the lifting speed
-Lift: defines the lifting distance
In this tutorial you will learn how to add the chainweld functionality to a welding seam!


